

OpenCart Installation Error: OpenCart एक popular open-source eCommerce platform है, लेकिन installation के समय कई users को अलग-अलग प्रकार के errors दिखाई दे सकते हैं।
उदाहरण के लिए:
- OpenCart installation page open नहीं हो रहा
- Database connection failed
config.phpmissing error- PHP version incompatible
- Required PHP extension missing
- Permission denied
- Blank/white screen
- 500 Internal Server Error
HTTP ERROR 500Access denied for userUnknown databaseCall to undefined functionClass not found- Installation stuck at database step
अच्छी बात यह है कि इनमें से अधिकांश problems को server requirements, PHP configuration, file permissions और database settings को सही करके fix किया जा सकता है।
इस guide में हम OpenCart Installation Error को step by step diagnose और fix करेंगे।
OpenCart Install करने से पहले Server Requirements Check करें
सबसे common mistake यह है कि user बिना server requirements check किए OpenCart upload करके installation शुरू कर देता है।
सबसे पहले अपने hosting/server पर ये चीजें verify करें:
Important Requirements
- PHP version OpenCart version के compatible हो
- MySQL/MariaDB available हो
- Required PHP extensions enabled हों
- Apache/Nginx properly configured हो
mod_rewriteavailable हो यदि Apache use कर रहे हैं- PHP memory limit sufficient हो
- File upload enabled हो
- Correct file permissions हों
Important: OpenCart की अलग-अलग versions की PHP requirements अलग हो सकती हैं। इसलिए जिस OpenCart version को install कर रहे हैं, उसकी official documentation में supported PHP version जरूर verify करें।
OpenCart Installation Error का सबसे पहला Diagnosis
अगर installation error आ रहा है, तो तुरंत files बदलना शुरू न करें।
पहले यह check करें:
Browser
   ↓
Domain
   ↓
Web Server
   ↓
PHP
   ↓
OpenCart Files
   ↓
Database
इस flow में जिस level पर problem है, उसी level पर troubleshooting करनी चाहिए।
OpenCart Files Correct Location पर Upload करें
मान लीजिए आपका domain है:
example.comतो OpenCart files सामान्यतः document root में होनी चाहिए:
public_html/Example:
public_html/
├── admin/
├── catalog/
├── extension/
├── image/
├── system/
├── storage/
├── config.php
└── index.php
यदि आपने OpenCart को इस तरह upload किया:
public_html/opencart/तो website इस URL पर open हो सकती है:
example.com/opencart/लेकिन यदि आपका intention root domain पर OpenCart चलाने का है, तो files को सही document root में रखना होगा।
ZIP Extract करने के बाद Extra Folder Check करें
यह बहुत common OpenCart installation problem है।
ZIP extract करने के बाद कभी-कभी structure ऐसा बन जाता है:
public_html/
└── upload/
    ├── admin/
    ├── catalog/
    ├── system/
    └── index.php
जबकि आपको चाहिए:
public_html/
├── admin/
├── catalog/
├── system/
└── index.php
Solution
upload folder के अंदर की OpenCart files को सही document root में move करें।
config.php File Missing Error Fix करें
OpenCart installation में config.php एक important configuration file है।
यदि error मिलता है:
Warning: require(config.php): failed to open streamया:
config.php not foundतो सबसे पहले check करें कि root directory में:
config.phpfile मौजूद है या नहीं।
Example:
public_html/
├── config.php
├── index.php
├── admin/
├── catalog/
└── system/
अगर OpenCart installation process config.php generate कर रहा है, तो directory permissions भी check करें।
admin/config.php Problem Fix करें
OpenCart में admin directory की configuration भी important है।
Typical structure:
public_html/
├── config.php
└── admin/
    └── config.php
अगर admin panel open करते समय configuration-related error आता है, तो admin/config.php की मौजूदगी और उसके paths verify करें।
Database Connection Error कैसे Fix करें?
OpenCart installation के दौरान सबसे common error database connection का होता है।
Possible messages:
Could not connect to the databaseया:
Access denied for userया:
Unknown databaseDatabase Details Check करें
आपको सामान्यतः ये details चाहिए:
Database Name
Database Username
Database Password
Database Host
Database Port
Example:
Database Host: localhost
Database Name: opencart_db
Database User: opencart_user
Database Password: ********
MySQL Database Create करें
cPanel या hosting panel में:
MySQL Databases → Create Database
Example:
Database Name:
opencart_db
फिर database user create करें:
Username:
opencart_user
और strong password set करें।
इसके बाद user को database के साथ assign करें।
Important
User को appropriate database privileges दें।
यदि user database से connected नहीं है, तो OpenCart installation database error दे सकता है।
Access denied for user Error Fix
अगर आपको यह error मिलता है:
Access denied for user 'username'@'localhost'तो usually database username/password गलत है या user को database privileges नहीं मिले हैं।
Check करें
Database Name     ✓
Database Username ✓
Database Password ✓
Database Host     ✓
User Privileges   ✓
Hosting पर database name अक्सर prefix के साथ होता है।
उदाहरण:
username_opencartना कि केवल:
opencartइसलिए hosting panel में दिखाई गई exact database details use करें।
Unknown database Error Fix
अगर error है:
Unknown database 'opencart'तो इसका मतलब OpenCart जिस database को access करने की कोशिश कर रहा है, वह database server पर मौजूद नहीं है।
Solution
Database panel में verify करें:
Database exists?यदि नहीं:
- Database create करें।
- User create करें।
- User को database से attach करें।
- Required privileges दें।
- Installation में exact database name enter करें।
PHP Version Compatibility Error
OpenCart installation problems का एक बड़ा कारण PHP version mismatch है।
Example:
OpenCart Version
        ↓
Required PHP Version
        ↓
Server PHP Version
अगर OpenCart version और PHP version compatible नहीं हैं, तो errors आ सकते हैं:
Deprecated
Fatal error
Call to undefined function
Class not found
500 Internal Server Error
Solution
Hosting panel में जाकर PHP version check करें।
अक्सर option मिलता है:
Select PHP Versionया:
MultiPHP Managerलेकिन blindly latest PHP version select न करें।
पहले अपने OpenCart release की official compatibility requirements verify करें।
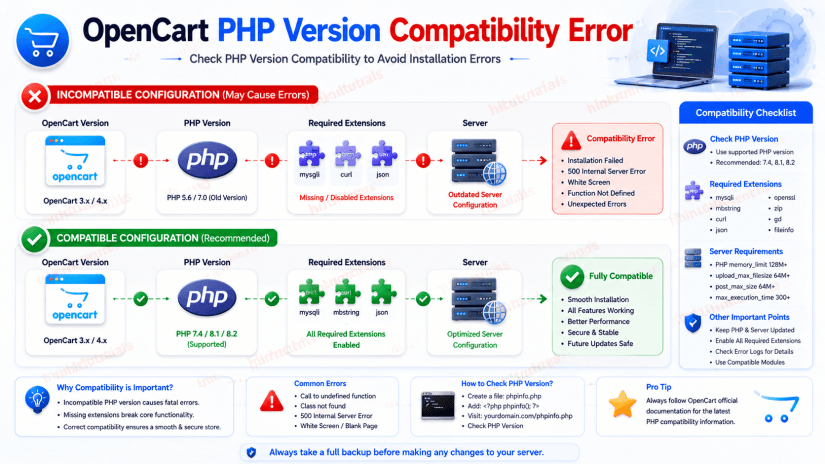
Required PHP Extensions Missing हैं
OpenCart को कुछ PHP extensions की आवश्यकता हो सकती है।
Commonly relevant extensions में शामिल हो सकते हैं:
curl
gd
json
mbstring
openssl
zip
mysqli / PDO MySQL
fileinfo
Exact requirements OpenCart version के अनुसार बदल सकती हैं।
Check कैसे करें?
एक temporary PHP information file create कर सकते हैं:
<?php
phpinfo();
File:
phpinfo.phpBrowser:
https://example.com/phpinfo.phpफिर required extension search करें।
Security Tip: Checking के बाद
phpinfo.phpको server से delete कर दें, क्योंकि इसमें server configuration की sensitive information दिखाई दे सकती है।
Call to Undefined Function Error
Example:
Call to undefined function curl_init()इसका मतलब अक्सर required PHP extension enabled नहीं है।
अगर error:
curl_init()से संबंधित है, तो cURL extension check करें।
इसी तरह:
mb_strlen()से related error हो तो mbstring check करें।
General Rule
Error में जिस PHP function का नाम है, उससे संबंधित extension identify करें और hosting/server configuration में enable करें।
OpenCart Installation में Permission Denied Error
अगर आपको:
Permission deniedया:
Unable to write fileजैसी problem मिलती है, तो file/folder permissions check करें।
Linux server पर common permissions:
Files:   644
Folders: 755
लेकिन OpenCart की कुछ directories को installation/runtime के दौरान writable होना पड़ सकता है।
सभी files को 777 करना सही solution नहीं है।
पहले exact directory identify करें जिसे OpenCart लिखना चाहता है और minimum required permission दें।
Storage Directory की Permission Check करें
OpenCart versions में storage-related directories महत्वपूर्ण हो सकती हैं।
यदि error log किसी storage directory में write failure दिखाता है:
Unable to write cacheया:
Permission deniedतो उस directory की ownership और permissions check करें।
Linux server पर:
ls -laऔर:
ls -ld storageजैसे commands से permissions देख सकते हैं।
OpenCart Installation में 500 Internal Server Error
अगर browser में:
500 Internal Server Errorआता है, तो browser message से actual problem हमेशा पता नहीं चलती।
सबसे पहले Error Log देखें
Apache:
error_logNginx:
/var/log/nginx/error.logPHP-FPM logs भी check करें।
Useful Linux Commands
tail -f /var/log/nginx/error.logया:
tail -f /var/log/apache2/error.logExact path hosting/server setup के अनुसार अलग हो सकता है।
.htaccess के कारण Installation Error
अगर Apache server use हो रहा है और .htaccess के बाद website error देने लगी है, तो temporarily .htaccess rename करके test कर सकते हैं।
Example:
.htaccessको:
.htaccess.bakकरें।
फिर website test करें।
अगर website खुल जाती है, तो .htaccess configuration में problem हो सकती है।
Production website पर
.htaccesspermanently remove करने से पहले rewrite rules और SEO URLs की requirements समझें।
mod_rewrite Problem
OpenCart SEO URLs के लिए Apache पर rewrite functionality important हो सकती है।
अगर SEO URL enable करने के बाद:
404 Not Foundआता है, तो check करें:
mod_rewrite
AllowOverride
.htaccess
Apache configuration में।
Blank White Screen / White Page
OpenCart installation के दौरान अगर पूरा page blank दिखाई देता है, तो इसे White Screen of Death जैसा issue माना जा सकता है।
Possible reasons:
- PHP fatal error
- PHP version mismatch
- Missing extension
- Memory limit
- File permission
- Incompatible modification/extension
सबसे पहले
Server error log देखें।
Production server पर errors को publicly display करने के बजाय logs में देखना बेहतर है।
PHP Memory Limit Problem
अगर installation या OpenCart page load करते समय memory-related error आता है:
Allowed memory size exhaustedतो PHP memory limit check करें।
Example:
memory_limit = 256Mलेकिन exact value आपकी OpenCart version, extensions और hosting environment पर depend करेगी।
php.ini, hosting PHP settings या PHP-FPM configuration के माध्यम से setting बदलनी पड़ सकती है।
File Upload Size Error
Installation या admin में बड़े files upload करते समय:
The uploaded file exceeds the upload_max_filesize directiveजैसा error मिल सकता है।
Relevant PHP settings:
upload_max_filesize
post_max_size
max_execution_time
max_input_time
memory_limit
Example:
upload_max_filesize = 64M
post_max_size = 64M
ध्यान रखें कि post_max_size सामान्यतः upload_max_filesize से कम नहीं होना चाहिए।
Database Host localhost या 127.0.0.1?
Most shared hosting environments में database host अक्सर:
localhostहोता है।
लेकिन कुछ hosting/server configurations में database अलग server पर हो सकता है।
इसलिए हमेशा hosting provider द्वारा दिए गए database host को use करें।
गलत host देने पर:
Could not connect to databaseआ सकता है।
OpenCart Installation URL सही है या नहीं?
अगर files upload करने के बाद installation page open नहीं हो रहा, तो URL check करें।
Root installation:
https://example.com/Subdirectory installation:
https://example.com/shop/अगर SSL configured है, तो HTTPS use करें:
https://example.com/लेकिन incomplete SSL configuration की स्थिति में redirect loop भी हो सकता है।
HTTPS Redirect Loop Fix
अगर browser में:
Too many redirectsआ रहा है, तो check करें:
HTTP → HTTPS
HTTPS → HTTP
के बीच conflicting redirects तो नहीं हैं।
Possible locations:
.htaccess- Cloudflare
- Hosting panel
- Web server configuration
- OpenCart configuration
OpenCart Installation के बाद Admin Login नहीं खुल रहा
अगर frontend काम कर रहा है लेकिन:
/adminopen नहीं हो रहा, तो check करें:
admin/
admin/config.php
PHP compatibility
.htaccess
server error logs
अगर admin folder का नाम security के लिए change किया गया है, तो वही नया URL use करें।
Database Import Error
अगर installation के दौरान SQL/database operation fail होता है, तो possible causes:
- Database user privileges
- MySQL/MariaDB compatibility
- SQL mode
- Character set
- Server resource limitation
- Incomplete OpenCart files
पहले error log का exact SQL error देखें।
सिर्फ अनुमान लगाकर database settings बदलना avoid करें।
OpenCart Installation Error Troubleshooting Checklist
जब भी OpenCart install न हो, इस sequence को follow करें:
1. OpenCart Version Check
        ↓
2. PHP Version Check
        ↓
3. PHP Extensions Check
        ↓
4. Files Correct Directory में हैं?
        ↓
5. Database Created?
        ↓
6. Database User Created?
        ↓
7. User → Database Assigned?
        ↓
8. Correct DB Credentials?
        ↓
9. File Permissions?
        ↓
10. Error Logs?
        ↓
11. .htaccess / Rewrite?
        ↓
12. HTTPS / Redirect?
यह approach random troubleshooting की बजाय systematic troubleshooting में मदद करता है।
Quick OpenCart Setup Error Troubleshooting Table
| Error | Possible Cause | Solution |
|---|---|---|
| Database connection failed | Wrong DB details | DB host/name/user/password check करें |
| Access denied | User privileges/password | User को DB से assign करें |
| Unknown database | DB मौजूद नहीं | Database create करें |
| 500 Error | PHP/server error | Error logs देखें |
| Blank page | Fatal PHP error | PHP error logs check करें |
| Permission denied | Wrong permissions/ownership | Correct ownership + permissions |
| Undefined function | Missing extension | Required PHP extension enable करें |
| 404 | Rewrite/path issue | .htaccess और rewrite check करें |
| Config missing | File/path issue | config.php check करें |
| Too many redirects | HTTPS conflict | Redirect rules check करें |
| Memory exhausted | Low PHP memory | Appropriate memory limit set करें |
| Upload error | Low upload limit | PHP upload settings increase करें |
OpenCart Installation Error Fix करने का Best Method
एक professional developer के रूप में troubleshooting करते समय यह rule follow करें:
Don’t Do This
Error आया
↓
777 permissions
↓
PHP latest version
↓
Random config changes
↓
.htaccess delete
↓
Database reinstall
यह approach problem को और complicated कर सकती है।
Do This
Exact Error
↓
Identify Layer
↓
Check Log
↓
Verify Configuration
↓
Make One Change
↓
Test
↓
Confirm Result
यही सबसे reliable troubleshooting approach है।
Fresh OpenCart Installation की Recommended Process
एक clean installation के लिए:
Step 1
अपने OpenCart version की requirements verify करें।
Step 2
Compatible PHP version select करें।
Step 3
Required PHP extensions enable करें।
Step 4
Database create करें।
Step 5
Database user create करें।
Step 6
User को database से assign करें।
Step 7
OpenCart files document root में upload करें।
Step 8
Correct permissions और ownership verify करें।
Step 9
Installation URL open करें।
Step 10
Database credentials enter करें।
Step 11
Installation complete करें।
Step 12
Frontend और admin panel test करें।
Step 13
Temporary installation/configuration files को secure/remove करें, यदि आपकी OpenCart version/documentation ऐसा निर्देश देती है।
Step 14
HTTPS और SEO URLs configure करें।
Step 15
Final security check करें।
OpenCart Installation के बाद क्या Check करें?
Installation successful होने के बाद सिर्फ homepage open करके काम पूरा न मानें।
इन सभी चीजों को test करें:
- Homepage
- Product page
- Category page
- Search
- Add to Cart
- Checkout
- Customer registration
- Customer login
- Admin login
- Product management
- Image upload
- Order creation
- Payment method
- Shipping method
- SEO URL
- HTTPS
- Cache
- Error logs
SEO-Friendly OpenCart Installation के लिए Important Tips
Installation के बाद SEO configuration भी important है।
URL Structure
Bad:
index.php?route=product/product&product_id=100Better:
beautiful-product-nameया आपकी desired SEO URL structure के अनुसार clean URLs।
Important SEO Elements
- SEO-friendly URLs
- Canonical URLs
- XML Sitemap
- Robots.txt
- Meta Title
- Meta Description
- Product Schema
- Breadcrumb Schema
- Image ALT text
- HTTPS
- Mobile-friendly design
- Fast loading speed
OpenCart Installation Error के लिए FAQ
Q1. OpenCart install क्यों नहीं हो रहा?
सबसे common reasons हैं PHP incompatibility, missing PHP extensions, incorrect database credentials, wrong permissions और server configuration issues।
Q2. OpenCart में database connection error कैसे fix करें?
Database name, username, password और host verify करें। साथ ही database user को required privileges दें।
Q3. OpenCart में 500 error क्यों आता है?
PHP fatal error, incompatible PHP version, missing extension, permission issue या server configuration इसका कारण हो सकता है। सबसे पहले error logs check करें।
Q4. OpenCart installation में blank page क्यों आता है?
आमतौर पर PHP fatal error, incompatible PHP version या missing extension की वजह से blank page आ सकता है।
Q5. क्या OpenCart files को 777 permission देनी चाहिए?
नहीं। पूरे OpenCart installation को 777 करना recommended नहीं है। Minimum required permissions और correct ownership रखें।
Q6. OpenCart के लिए कौन सा PHP version use करें?
यह OpenCart release पर depend करता है। अपने exact OpenCart version की official requirements के अनुसार supported PHP version चुनें।
Q7. OpenCart installation के बाद admin panel नहीं खुल रहा, क्या करें?
admin directory, admin/config.php, PHP compatibility, permissions, rewrite configuration और server error logs check करें।
OpenCart Installation Error को fix करने का सबसे आसान तरीका random settings बदलना नहीं, बल्कि error को layer-by-layer diagnose करना है।
सबसे पहले:
OpenCart Version
↓
PHP Version
↓
PHP Extensions
↓
OpenCart Files
↓
Database
↓
Permissions
↓
Error Logs
↓
.htaccess / Rewrite
↓
HTTPS
इन सभी components को systematically check करें।
अगर आप OpenCart 2, OpenCart 3 या OpenCart 4 use कर रहे हैं, तो सबसे important बात यह है कि अपने exact OpenCart version की PHP और server compatibility requirements को follow करें।
इस approach से अधिकांश installation problems को बिना unnecessary changes के identify और fix किया जा सकता है।

Welcome to HindiTutorials, your go-to platform for learning and mastering concepts in Hindi! Our mission is to make education accessible and simple for everyone by providing high-quality tutorials on programming, technology, and various other topics.